Here is a time lapse of a casing being printed on a 3d printer, this model was custom designed and was developed for Macroponics.
Uncover a realm of opportunities.
With the ability to Model and 3D print objects in Metal and plastic, I am able to craft any type of prototype quickly and reliably.
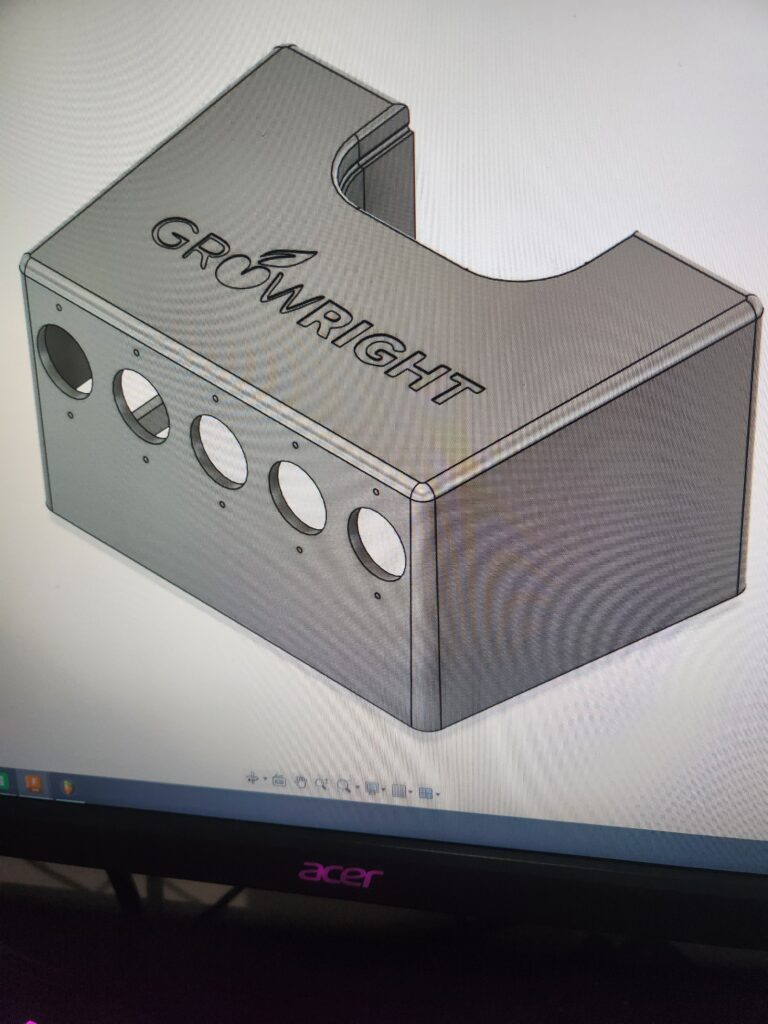
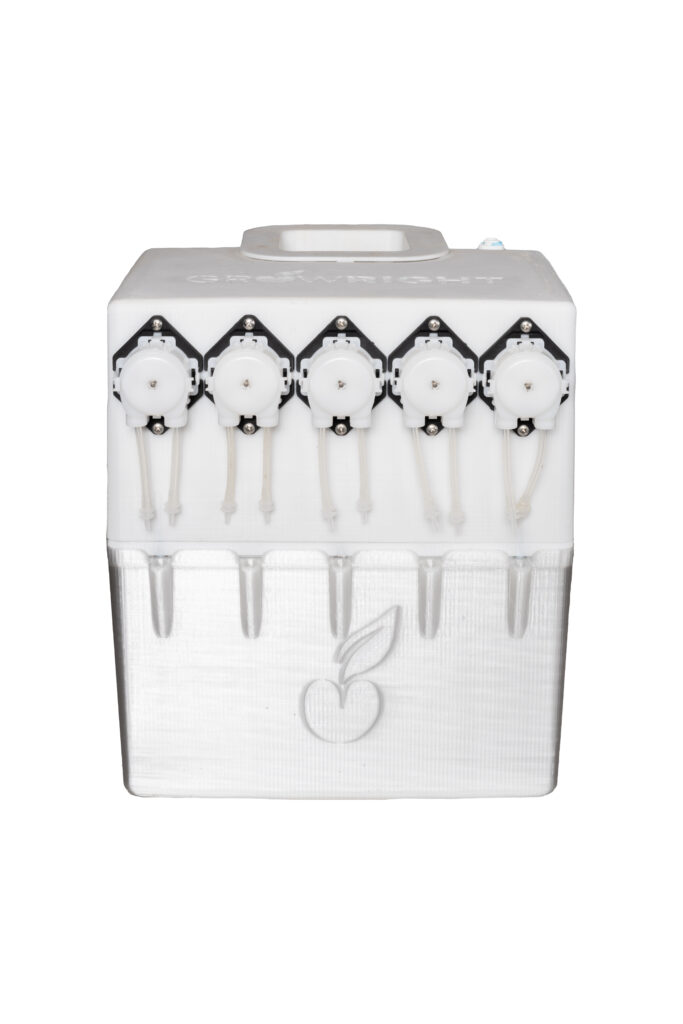

Shown below is a time lapse of the metal components that were printed for the GrowRight modular LEDs.
Re-imagine what is possible…
Do you have an idea you want to have modeled, printed and sent to you? Have questions about what is possible with 3D printing?
Tutorials can serve as valuable launching pads for anyone interested in 3D printing, offering a structured introduction to the principles of design, material science, and the intricacies of additive manufacturing. However, as many seasoned makers have discovered, true mastery of 3D printing comes from immersing yourself in hands-on experimentation and iterative learning.
This page is dedicated to the discussion of 3D printing and the vibrant community that surrounds it, a space where experienced engineers, hobbyists, and newcomers alike can share insights, innovative techniques, and practical experiences. By building a close-knit network of creators, we can collectively disseminate the most useful and up-to-date information, ensuring that everyone benefits from shared knowledge and collaborative problem solving.
Whether you’re refining your skills through meticulous prototyping or exploring new materials and cutting-edge technologies, remember that while tutorials provide the foundation, real progress is achieved through active participation and community engagement. Together, we can transform the world of 3D printing into a dynamic hub of innovation, where every challenge is an opportunity to learn and every success propels us toward even greater achievements.
The Mystical Frontier of 3D Printing
3D printing has opened the door to a new kind of creation, one where ideas move directly from imagination into physical form. But not everything we create behaves in predictable ways.
I use the term anomalous objects to describe prints that seem to carry unexpected effects, psychological, symbolic, or deeply personal in ways that go beyond their physical design. These aren’t just tools or decorations. In some cases, they can function as what’s known as an info-hazard: something that has the potential to cause harm simply through exposure, interpretation, or interaction.
In a 3D printing context, that could mean an object that influences behavior, triggers distress, or spreads unintended consequences through replication. The risk isn’t always mechanical, it can be cognitive or cultural, emerging from how the object is perceived and shared.
This idea didn’t come out of nowhere. Much of it is influenced by my work exploring symbolic systems and ritual structure through my Golden Dawn focused website. That project examines how geometry, symbolism, and intentional design can affect perception and internal states, concepts traditionally explored in esoteric traditions but increasingly relevant in modern digital creation.
When those same principles are translated into physical objects through 3D printing, the result is something different. Symbols are no longer confined to a page or a screen, they become tangible, repeatable, and distributable at scale. What was once studied in a controlled or intentional context can now be reproduced by anyone, anywhere, often without the same level of understanding.
This raises an uncomfortable question: what responsibility do we carry as creators when the things we produce may have effects we don’t fully understand?
Innovation alone isn’t enough. As fabrication becomes more accessible, the need for ethical awareness grows with it. We’re no longer just making objects, we’re shaping experiences, reactions, and, in some cases, consequences that extend far beyond the print bed.
This becomes especially clear when we move from abstract ideas to real-world examples, where the line between experimentation and impact is no longer theoretical.


One of the most immediate and controversial examples of this is the rise of 3D-printed firearms.
Unlike hypothetical anomalous objects, these are very real, and their risks are not speculative. They represent a point where digital information becomes a physical tool with direct, irreversible consequences. A file can be shared globally in seconds, and with the right equipment, transformed into something capable of harm.
In that sense, 3D-printed firearms blur the line between object and information hazard. The danger isn’t just the object itself, it’s the accessibility, the replication, and the loss of traditional safeguards that once limited who could create and distribute such tools.

When Regulation Expands Beyond the Object
This tension between innovation and risk becomes even more complex when regulation enters the picture.
In response to the rise of 3D-printed firearms, often referred to as “ghost guns”, lawmakers across the United States have begun introducing increasingly aggressive restrictions. In several states, manufacturing or possessing unserialized 3D-printed firearms is already illegal, and in others, the act of printing them is explicitly prohibited.
But the conversation is no longer limited to the objects themselves.
A growing number of proposals aim to regulate the machines and information that make these objects possible. Some states have introduced or passed legislation requiring 3D printer manufacturers to implement safeguards that prevent the printing of firearm components entirely.
In more extreme cases, lawmakers have explored:
- Requiring printers to scan and reject certain files before printing
- Regulating or banning the distribution of digital blueprints
- Imposing background checks for purchasing high-capability 3D printers
- Mandating “print-blocking” software at the firmware level
On paper, these measures are framed as targeted safety solutions. In practice, they introduce a much broader question:
What happens when a tool is restricted not by what it is, but by what it might be used to create?


Unlike traditional manufacturing, 3D printing does not inherently “know” what it is producing. It operates on geometry, shapes, layers, and instructions. A cylinder, a spring, or a housing component may be part of a firearm… or part of a completely unrelated design. Attempting to block one inevitably risks interfering with the other.
Critics of these proposals argue that such safeguards function less like regulation and more like embedded censorship, forcing general-purpose creative tools to evaluate and restrict intent, something they are fundamentally not equipped to do.
And this is where the broader impact becomes clear.
By placing constraints on what can be printed, these regulations don’t just affect the production of weapons, they also inhibit legitimate experimentation, prototyping, and artistic creation. The same open-ended capability that allows for dangerous misuse is also what enables innovation in fields like engineering, education, medicine, and independent design.
In other words, the effort to eliminate one category of “anomalous object” risks suppressing countless others, many of which represent genuine progress.
Closing Bridge
From the perspective introduced earlier, this creates a paradox.
If anomalous objects are defined not just by their form, but by their potential impact, then regulation itself becomes a kind of filter on reality. It determines which ideas are allowed to manifest physically, and which are stopped before they ever leave the digital realm.
The question is no longer just what should we create?
But increasingly: who decides what we’re allowed to create at all?

